Get the look of new cabinets in one weekend for one-third the cost!
Sponsored By: The Home Depot
A portion of this piece was created in partnership with The Home Depot, the largest home improvement retailer in the United States.
Introduction
Tools Required
- 4-in-1 screwdriver
- Brad nail gun
- Caulk gun
- Circular saw
- Cordless drill
- File
- Forstner drill bits
- Laminate slitter
- Miter saw
- Paper cutter
- Veneer tool
Consider a cabinet makeover from The Home Depot as a quick and easy way to refresh your kitchen in just a few days. Learn more.
Overview of Refacing Cabinets
Refacing cabinets is a quick and easy way to change the look of your kitchen without the mess and expense of a complete remodeling. You simply cover the cabinet face frame with self-sticking wood veneer and the end panels with 1/4-in. plywood. Then replace the old doors and drawer fronts with new ones. Refacing costs about one-third what new cabinets would cost, plus you can leave the countertop in place for even greater savings. And by doing the work yourself, you’ll also save at least $1,000 in labor for a small kitchen, and a lot more if your kitchen is large.
Refacing cabinets does require attention to detail and some experience working with tools, but you don’t have to be a master carpenter. If you can measure and cut accurately, you shouldn’t have any trouble.
Special Tools for Working with Veneer
We use a Virutex laminate slitter to cut strips of veneer. It’s the perfect tool for this project, but if you don’t want to spend the money, you can rent a laminate slitter. A table saw also works.
You’ll need a veneer tool to apply adequate pressure for a good bond.
For cutting veneer strips to length, we used a paper cutter modified slightly for more accurate cuts. We found that even an inexpensive paper cutter works great for cutting veneer.
Project step-by-step (20)
Three Simple Steps to Transform Your Kitchen Cabinets: Reface Cabinets
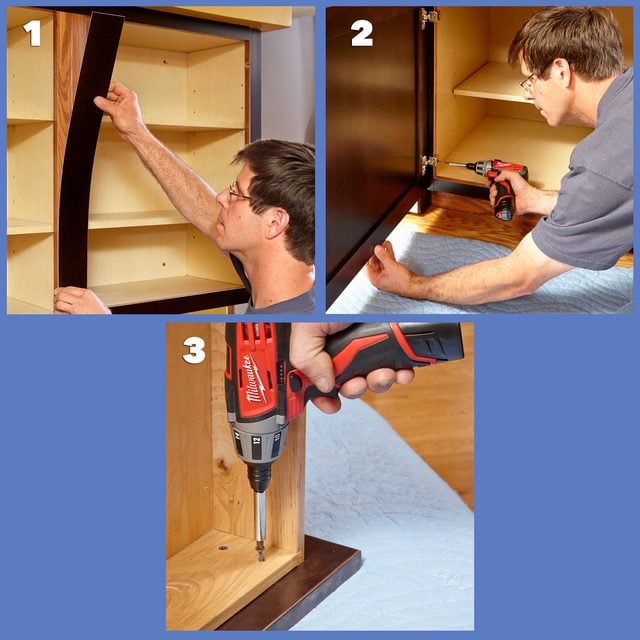
Refacing cabinets is a great way to give your kitchen a new look with a minimum of mess and inconvenience. In a nutshell, here’s how to reface cabinets:
- Remove the doors and drawers and cover the front edges of the cabinets with peel-and-stick wood veneer.
- Hang the new doors with easy-to-adjust, easy-to-install cup hinges.
- Attach new drawer fronts to your existing drawers. Finish up by replacing moldings and installing new hardware.
Before DIY Cabinet Refacing
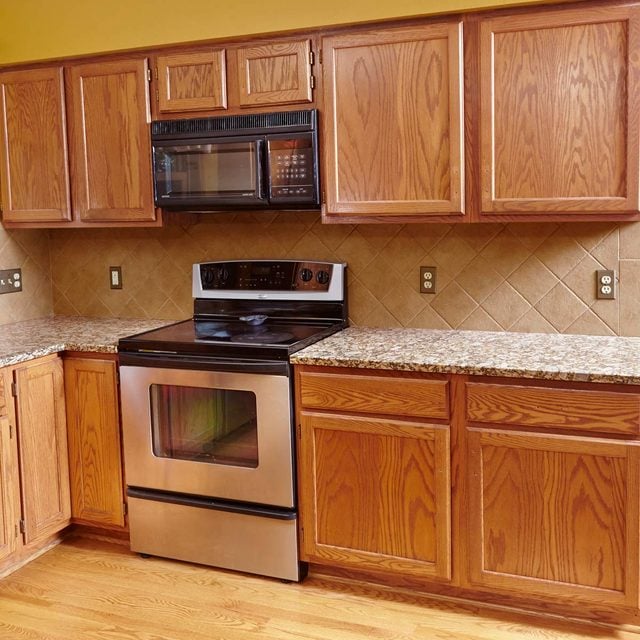
The original cabinets in this kitchen are basic, entry-level cabinets. Give standard kitchen cabinets a unique, custom look by refacing them. Here are a few tips to renew your kitchen cabinets.
After DIY Cabinet Refacing
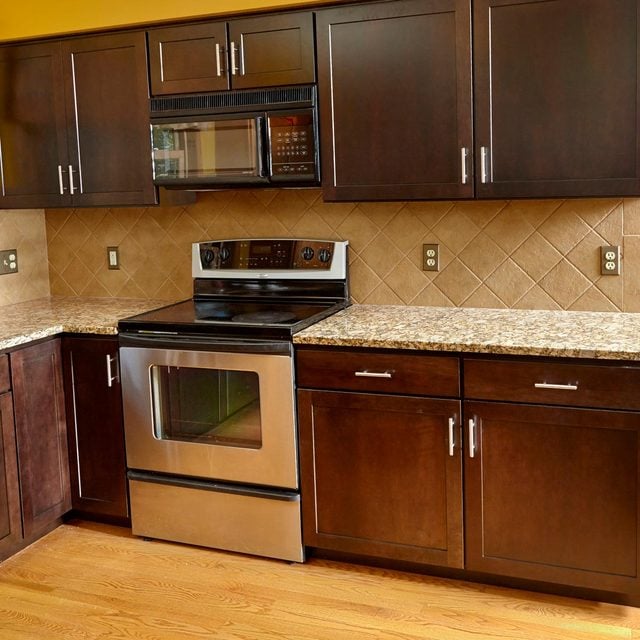
The new color and appearance of the veneer kitchen cabinets change the entire look of the kitchen.
Measuring a Cabinet
Measure each cabinet as shown to get the correct sizes for new doors, drawers and end panels.
Figure B: Cabinet Door Types
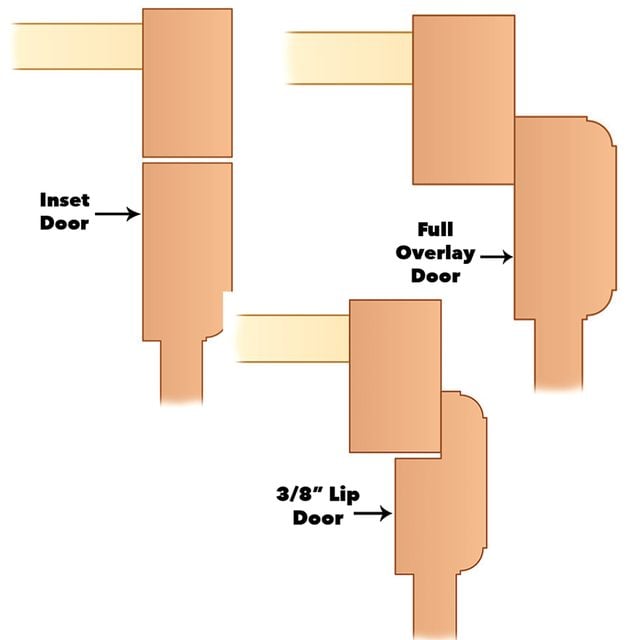
If you have inset or lip doors, you can convert them to overlay doors for your refacing project just by using the correct overlay cup hinge.
How to Order New Doors and Drawers
There are three standard types of cabinet doors: overlay, inset and 3/8-in. lip (Figure B). Regardless of what type of doors you currently have, in most cases, you can replace them with overlay doors that use modern, fully adjustable cup hinges. And that’s the situation we’re showing here.
To size the doors, you’ll need to decide how much of the door you want to extend past the face frame opening. This is called the overlay distance and is determined by the hinges you install. To keep it simple, our expert cabinet remodel builder gives his customers a choice between 1/2-in. overlay, which is the most common, or 1-1/4- in. overlay. Depending on the hinge, you can choose a different overlay if you like. The 1-1/4-in. overlay doors hide more of the face frame for a more contemporary look. But the extra door width can cause problems. You have to measure carefully at inside corners and between doors to make sure there’s enough room. And remember, the new drawer fronts will be the same width, so check at inside corners to make sure there’s clearance for the drawers to open without handle conflicts. Also, there’s usually not enough space to add the extra 1-1/4 in. to the top and bottom of both doors and drawer fronts, so you may have to customize these overlay distances.
For our kitchen, we ordered doors that overlay the cabinet 1-1/4 in. on the sides and bottom, but reduced the top overlay to 3/4 in. Then he reduced the top and bottom overlay of the drawers to 3/4 in. to avoid conflict with a built-in breadboard. If you decide to order an overlay greater than 1/2 in., you can check the fit by applying tape to the face frame to represent the outside edges of the doors and drawers. This allows you to visualize the doors installed and alert you to any problems.
The most critical part of the cabinet door refacing job is measuring for and ordering the new doors and drawers. Start by making a sketch of each wall of cabinets showing the doors and drawers. Then measure the openings and write down the measurements—width first, then height (Figure A). Double the overlay distance and add this to the opening size to get the size of the door or drawer. For example, if the opening is 18 x 20 in., the door size with a 1/2-in. overlay would be 19 x 21 in. If you want a pair of doors to cover one opening, add two times the overlay to the opening size as usual. Then subtract 1/4 in. for clearance and divide this number by two to get the size of each door.
Calculate drawer front sizes the same way. Add two times the overlay distance to the opening size to arrive at the drawer front size.
Inside corner cabinets with or without rotating shelves can be a little trickier. We found that we can replace most existing corner cabinet doors with a “scissors-hinged” door—that is, a pair of doors hinged together and hung from one pair of hinges (see below). Ask your cabinet door supplier for help figuring the size of corner cabinet resurface doors.
Double-check all your measurements and calculations before you place the order.
Where to Get Your Materials

In addition to new drawer and door fronts, a typical cabinet refacing job includes covering the face of the cabinet frames with veneer and the end panels with 1/4-in. plywood to match. While it’s optional, most cabinet door refacing projects also include a new cove molding at the top of the cabinets and a thin layer of matching plywood to cover the cabinet toe-kick.
We ordered doors, drawer fronts, veneer, plywood and moldings prefinished from the manufacturer, but our supplier only sells to professionals. You can search online for cabinet-refacing supplies to find companies that will provide all the parts prefinished, or you can buy unfinished parts and finish them yourself. A few sources for unfinished doors are Distinctivedoordesigns.com and Rawdoors.net. At Rockler.com, you’ll find doors and 2 x 8-ft. sheets of veneer with pressure-sensitive adhesive (PSA) on the back. Ask at your local lumberyard for 1/4-in. hardwood plywood and moldings.
Measure and make a list of the veneer strips you’ll need to cover the face frames. From this list, figure out how many 24 x 96-in. sheets of PSA-backed veneer sheets you’ll need. Allow extra material, though. There are a few inches on the outside edges of PSA veneer that are unusable. On average, one sheet will cover face frames for about 15 doors. Expect to spend about $90 per sheet for the veneer.
Then measure the end panels and make a list of the sizes you need. You can order the plywood cut to rough size from some online suppliers, or figure out how many 4 x 8-ft. sheets of 1/4- in. plywood to buy from the lumberyard. The face frames on most modern cabinets overhang the end panel slightly. Rather than cut off this overhang, which is messy and time-consuming, We created a flush surface by gluing a filler panel to the end first. Most cabinets have either a 1/8-in. or a 1/4-in. overhang, so check yours and buy the appropriate thickness of plywood or hardboard to fill the space. Finally, make a list of the moldings you’ll need, including the toe-kick cover.
You’ll also need denatured alcohol, rags, medium-grit sanding sponge, construction adhesive, 3/4-in. brad nails and a stain pen and colored wood putty, not wood filler to match the new stain color.
Prepare the Cabinets
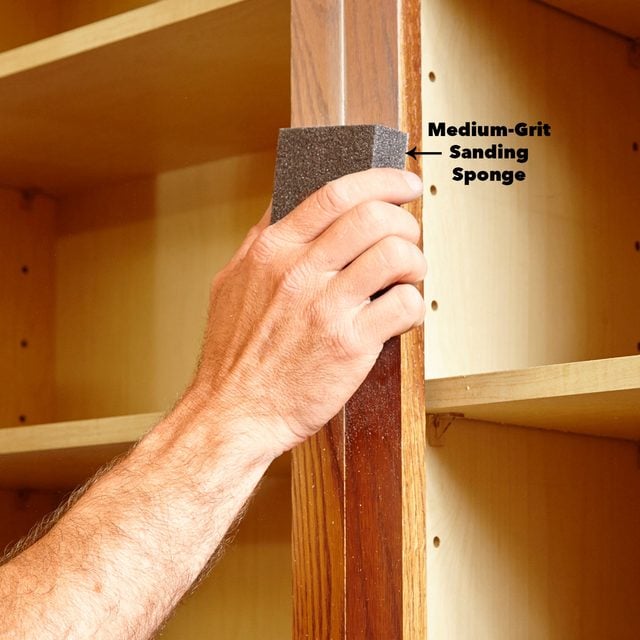
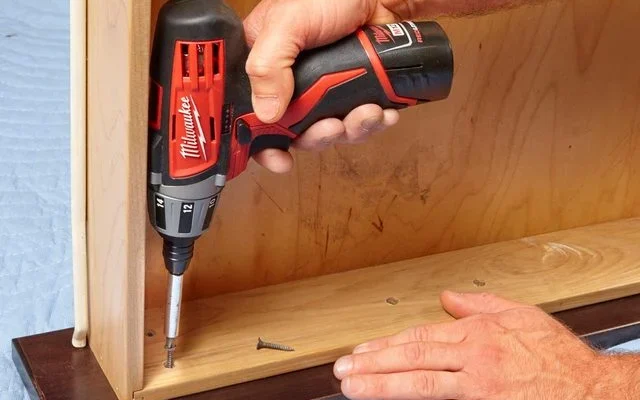
Since the sanding involved creates a little dust, We recommend emptying the cabinets before you start. Next, remove the doors by unscrewing the hinges from the face frame. Also, remove or modify the drawer fronts. There are two types of drawers. On most new cabinets, the drawer front is a separate piece and can be taken off by removing the screws from inside the drawer. But some drawer fronts are attached to the drawer sides. If you have this type of drawer, you’ll have to take the drawer out and remove the overhanging parts of the front by sawing them off. Then you’ll screw through the old drawer fronts to attach the new ones.
Test the fit by placing the modified drawer back into the cabinet remodel and pushing it in to make sure there’s enough clearance behind the drawer for the drawer front to sit flush with the surface of the face frame. If the drawer protrudes, you’ll have to order or build new drawers. In addition to removing doors and drawer fronts, pry off any moldings you plan to replace.
To ensure that the pressure-sensitive adhesive on the veneer and the construction adhesive for the end panels bond well, the face frames and end panels must be clean and scuffed up slightly. Start by cleaning all of the face frames and end panels with a rag dampened in denatured alcohol. Then scuff all the surfaces with a medium-grit sanding sponge. Don’t use a power sander or sand to bare wood. The PSA-backed veneer won’t stick well to bare wood. Finally, clean the surfaces again with denatured alcohol to remove the dust.
We didn’t bother to fill small screw holes or other small imperfections. The veneer is thick enough to span them without a problem. But we used a two-part hardening-type wood filler to fill large dents and chips. We sometimes encounter a face frame stile at the end of cabinets that’s rounded or beveled. We fill the bevel or round-over with the two-part wood filler after installing the new end panels but before applying the face frame veneer.
Install End Panels
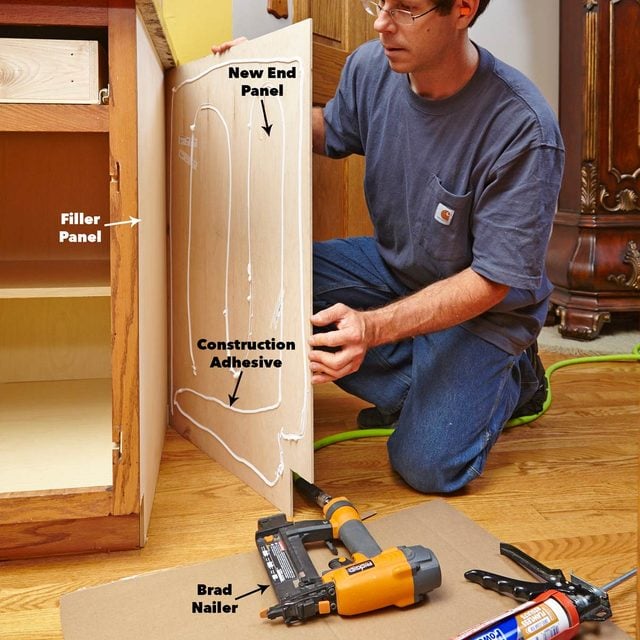
With the cabinets prepped and cleaned, it’s time to start making the transformation. The first step is to install the end panels. If the face frame overhangs the existing end panel, add a filler to create a flush surface. We attach plywood with construction adhesive and use a few 3/4-in. brads to hold it in place. Next, measure and cut an end panel to size so its front edge is flush with the surface of the face frame. Hold the end panel in place and mark the notch for the toe-kick. Cut out the notch. Then install the panel with construction adhesive and a few brads. Cover all the end panels before starting on the face frame veneer.
Cut Cabinet Veneer Sheets into Strips
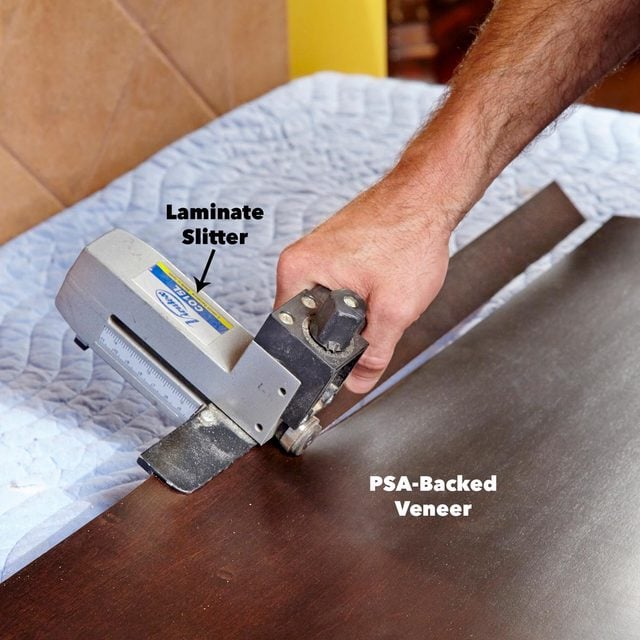
There are two methods for applying cabinet veneer sheets to a face frame. You can cut and install oversize strips and trim them in place with a sharp razor knife. But we prefer to cut the strips to the exact width and length needed before applying them. We do this easily with a special tool called a laminate slitter. The tool is intended to cut strips of plastic laminate, but it works great for veneer, too. To use it, you set the depth and width of the cut. Then simply slide the tool along the edge of the sheet to create a perfect-width strip. As we show below, you can also use a table saw to cut strips of veneer.
Measure the width of the stiles and rails and cut strips from the sheet of PSA-backed veneer to fit.
Another Way to Cut Veneer

The slitter shown above isn’t the only tool you can use to cut cabinet veneer sheets—you can also use your table saw to cut the slits. For the best results, build a simple veneer-ripping jig. Cut a 3-in. strip from a 24 x 24-in. piece of particleboard or plywood and glue it to the edge of the remaining piece. Add 3/4 in. to the width of the veneer, you wish to cut and set the fence. Then send the jig through the saw, stopping about halfway through. Clamp the jig to the table saw fence and you’re ready to cut veneer strips. The jig keeps the thin veneer from sliding under the fence, and the narrow slot left by the saw blade supports the veneer to help prevent splintering.
Cut the Veneer to Length
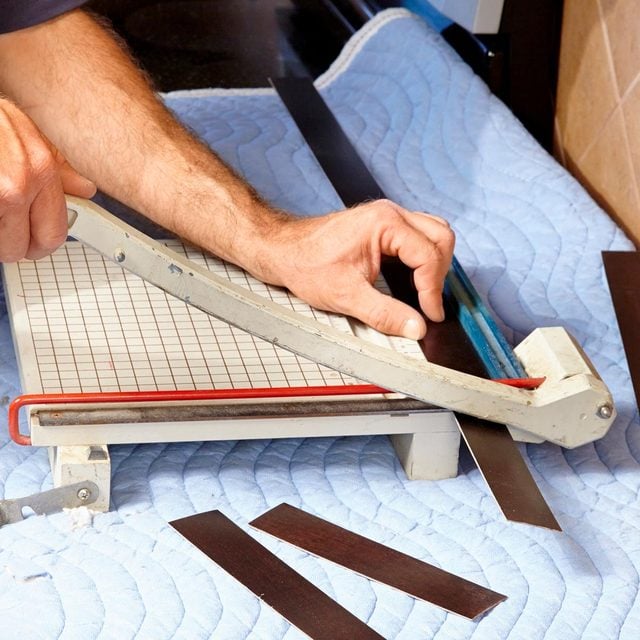
A paper cutter is a perfect tool for cutting the veneer to length. Measure the length of the stile and mark the strip of veneer. Line up the mark with the paper cutter blade and cut the strip to length.
Apply the Veneer
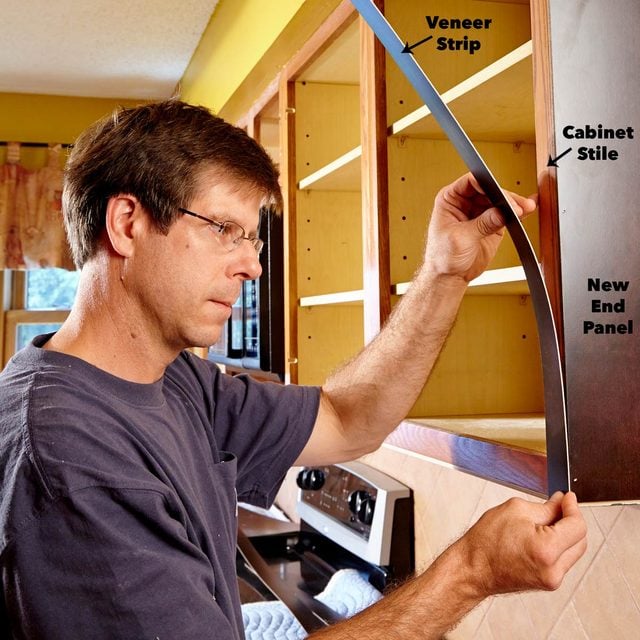
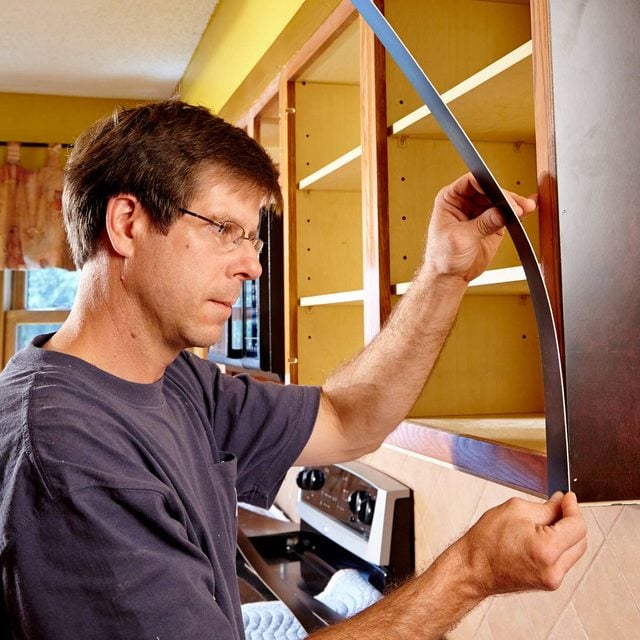
Start by applying veneer to the outermost stiles in a run of cabinets. Then carefully align the veneer and press it lightly to the surface of the face frame. If you don’t press too hard, you can still realign it.
Press the Veneer
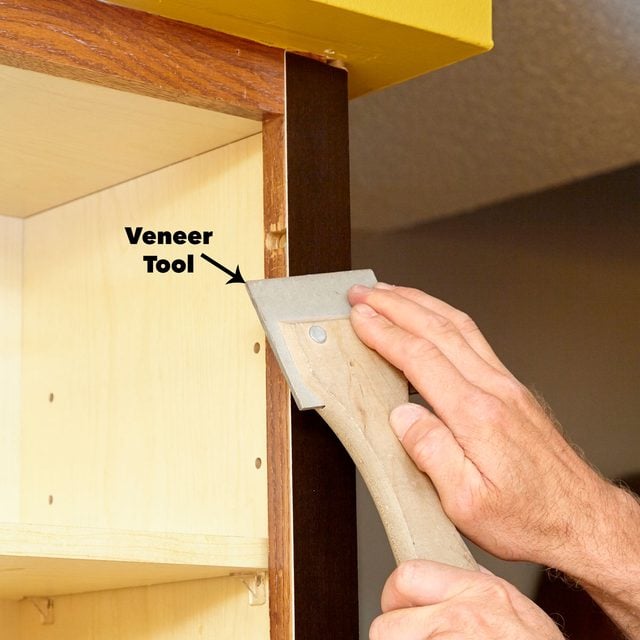
Smooth and bond the veneer by pressing it with the veneer applicator tool. Press down firmly to ensure a good bond. Next, measure the distance between the stiles and cut strips of veneer to cover the long horizontal rails. Check the fit before you pull off the paper backing. Then apply these strips and press them down. Cover the remaining stiles, and on the lower reface cabinets finish by covering the drawer rails.
If you have any veneer that overhangs the face frame slightly, carefully sand it flush. Finally, use a matching stain pen to touch up the unstained edges of the veneer and any other imperfections.
Measure for the Hinge Location
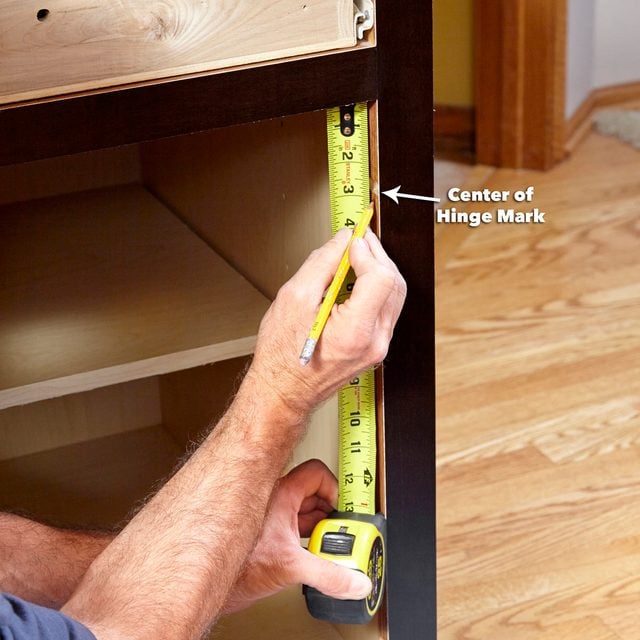
Start the door installation by mounting the cup hinges in the doors. Simply line up the hinge and press it into the large round recess. Then tighten the supplied screws to anchor the hinge. Prepare for hanging the doors by marking the center of the top hinge on the face frame stiles. Calculate this distance by measuring from the top of your new door to the center of the hinge and subtracting the overlay. You don’t need to mark for the lower hinge.
Hang the Door
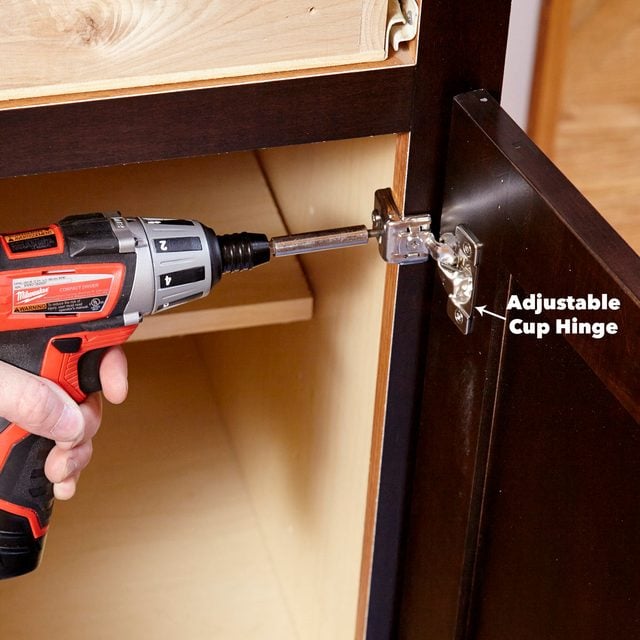
Line up the center of the hinge with your mark and drill a pilot hole. Then drive a screw through the top hinge plate into the stile. Attach the bottom hinge the same way.
Measure for the Drawer Front Placement
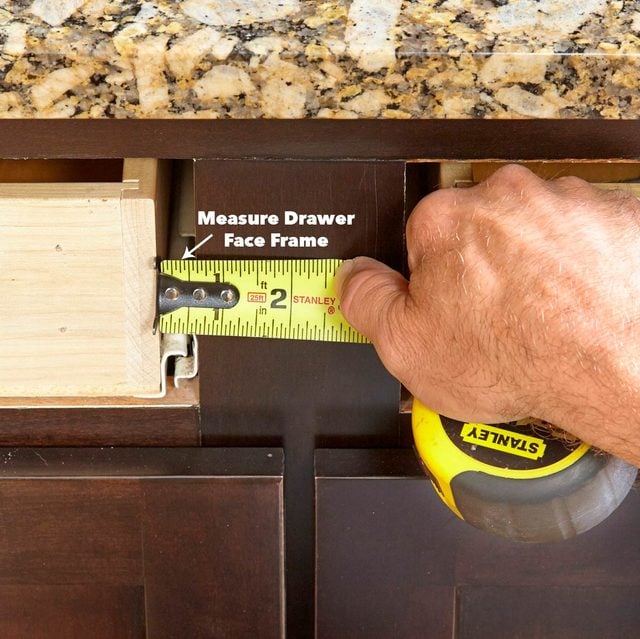
The key is to measure the distance from the drawer box to the face frame stile. Also, measure from the drawer bottom to the face frame drawer rail. Add the overlay distance to these measurements to arrive at the dimension you’ll mark on the back of the drawer front. Then transfer these measurements to the back of the drawer front, align the drawer and attach it with four screws.
Mark the Drawer Location
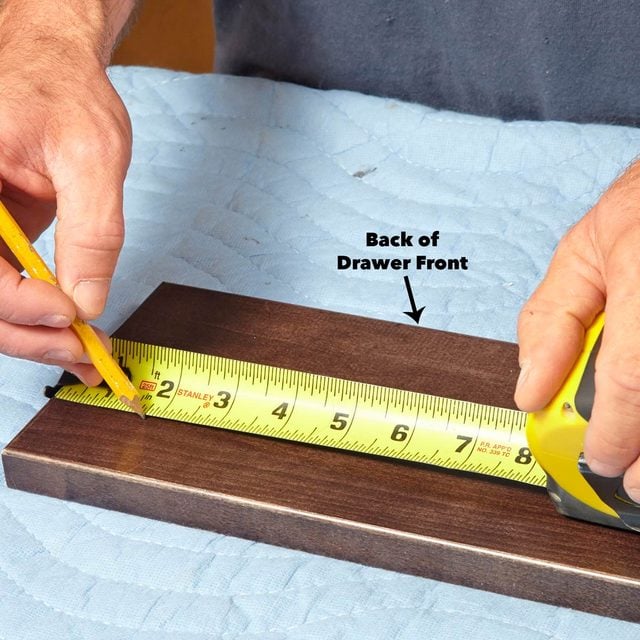
Use the dimensions you calculated in the last step to mark the back of the drawer front.
Attach the Drawer Front

Align the drawer box with the marks and drive screws through the drawer into the drawer front. Double-check the screw length to make sure the screws won’t go through the face of the new drawer front.
To make the drawer front adjustable, drill oversize screw holes through the drawer and put washers under the screw heads. With this method, you can loosen the screws and move the drawer front slightly to align it perfectly.
When you’re done with the door and drawer installation, adjust the hinges to align the doors with each other. Now you’re ready to install your new cabinet door and drawer hardware. For great tips on installing door hardware, see how to install cabinet hardware.
Finish the project by installing cove molding along the top of the wall veneer kitchen cabinets and covering the toe-kick with a thin strip of plywood finished matching the rest of the wood.
If a Corner Door Needs Special Hinges
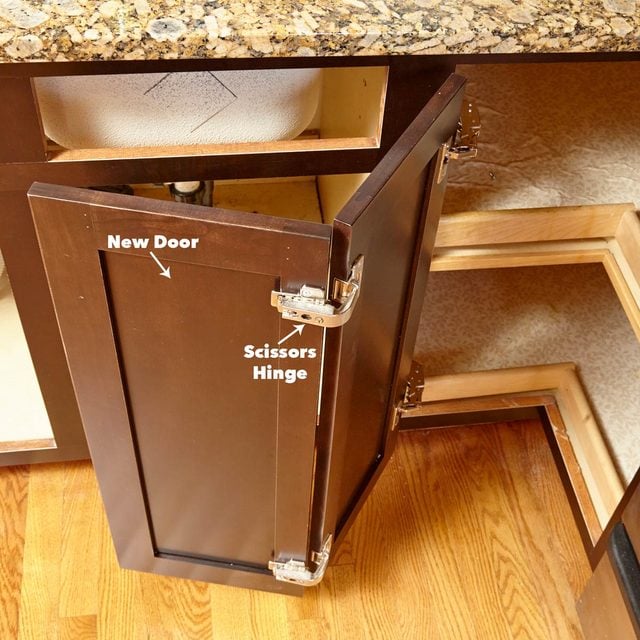
Talk to your door supplier if you need corner doors like these. They require special hinges. If your doors have a 1-1/4-in. overlay like these, you may have to cut 3/4-in.-deep notches in the face frame stile to mount the hinges.
